Tag Archives: step by step

DIY: how to make a spring flower crown

20 Mar

How to make a spring flower crown - step by step at Decorator's Notebook

Celebrate spring by making a pretty flower crown - step by step at Decorator's Notebook blog

Flower crown DIY - Decorator's Notebook blog

Make a flower crown with wild flowers - Decorator's Notebook

Wildflower headpiece - tutorial at Decorator's Notebook blog

Simple garden flower crown - DIY - Decorator's Notebook blog

It all started with a Friday afternoon twitter chat. You know the sort: when everyone’s an hour or so away from pouring their first G&T and avoiding the last few tasks they should be finishing for the week.

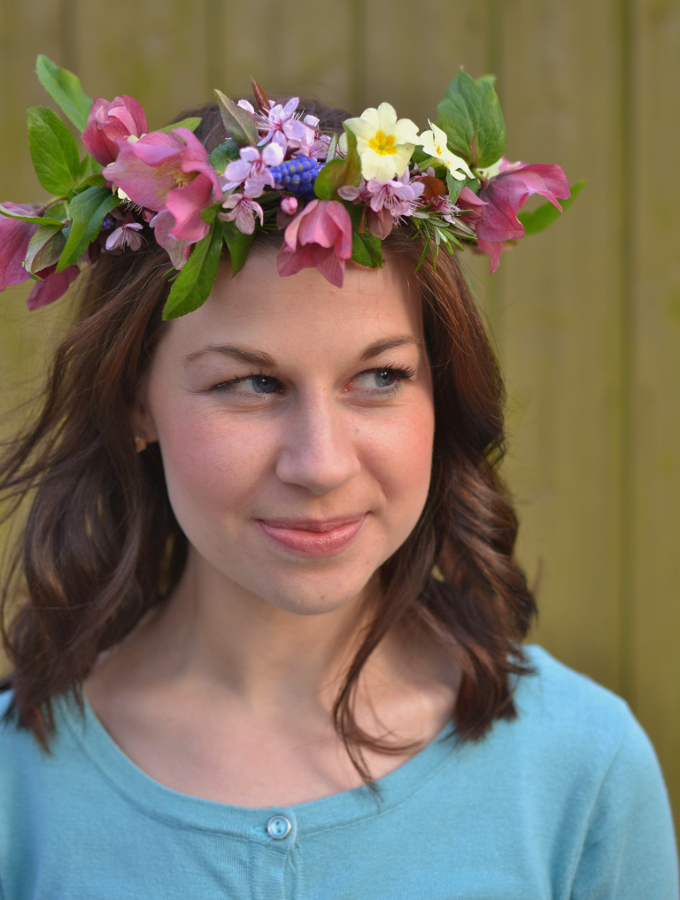
The conversation turned to having pictures of ourselves on our blogs. If you’ve been reading for a while, you might know that I wrote Decorator’s Notebook anonymously for the first two years, without my name, let alone with a mug shot looking out top right. There was some discussion around how posting a ‘blogger’s selfie’ can feel like a horribly awkward and self-conscious thing to do. But for me, it was actually one of the most important moments for me and my blog. Until I ‘came out’ I didn’t realise how detached I’d felt from the blogging community and how much I’d been holding back for years. The second I posted a photo of myself and wrote a proper ‘about me’ was the moment Decorator’s Notebook actually felt like mine.

One of the blogger profile pictures I like best in all the world is Michelle’s – go and check it out and see how the idea for #primaveracrowns was born! So, here’s my contribution… a simple garland of flowers from my Mum’s garden to celebrate the start of spring. Is anyone joining us? You know what, it doesn’t really matter. Because this is me, wearing my crown, on my blog. And I’m proud and happy to be here.

How to make a spring flower crown from garden flowers - DIY - Decorator's Notebook blog

DIY - how to make a spring flower crown - step by step at Decorator's Notebook blog

HOW TO MAKE A SPRING FLOWER CROWN

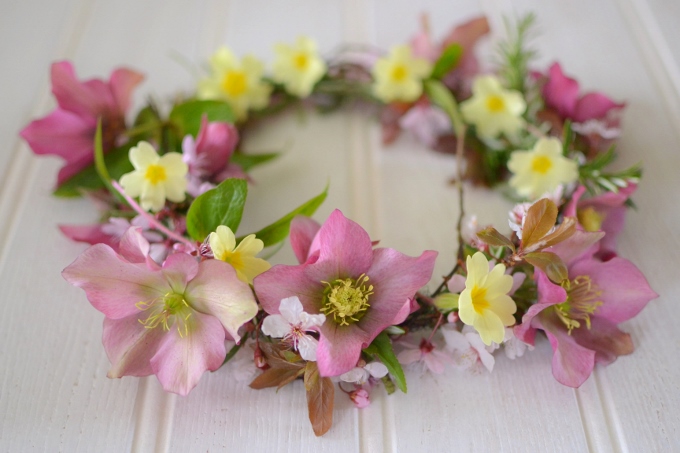
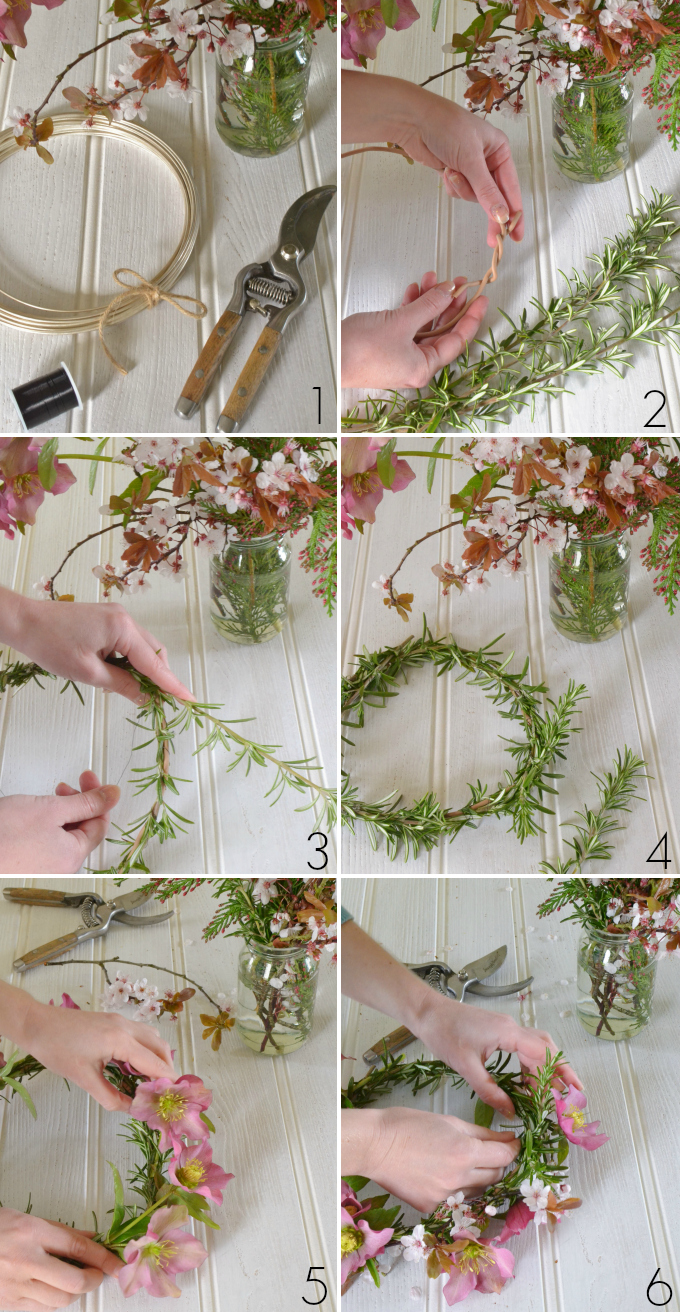
1 | Gather your supplies: thick wire (the rubber coated sort used for garden ties works well), some thin beading wire, secateurs and a selection of freshly-cut flowers and foliage. I used rosemary, hellebores, cherry blossom, primroses and grape hyacinths.

2 | Twist the thick wire into a circle just a little larger than you want it to be once it’s on your head – the finished crown will fit a little more snuggly once it’s filled out with flowers.

3 | Start by covering the wire with foliage. Something quite dense that comes in long stems will make this easier. Tuck the end into one of the twists in your wire then gently wrap the stems around, securing it every now and then with beading wire.

4 | This is where you want to end up – an evenly covered base on which to build. Now the fun begins!

5 | Add your flowers, starting with the bigger ones. Hold the stems in place with one hand while you secure them with beading wire with the other. If you want to get all florist-y about it you could use special wire and tape (see how here) but I find my way a lot less faff! How you position the flowers is completely up to you… I went for even spacing all the way around but something asymetric can look wonderful too. Head to my flower crown inspiration board for lots of ideas.

6 | Once your big blooms are spaced as you’d like, add in the smaller ones using the same technique, filling any gappy bits as you go.

An important note: soft-stemmed wild or garden flowers like these don’t like being out of water for long, so you’ll need to make your crown soon before you want to wear it or it will look wilted and sad! For a longer-lasting flower crown, choose blooms with woody stems like roses and eucalyptus – these will last overnight if spritzed with water and stored in a plastic bag in the fridge.

If you’ve made a flower crown with Michelle and I, please post your photos to Twitter, Facebook or Instagram using #primaveracrowns and add your link below. We can’t wait to see them!


Spring flower crown DIY by Decorator's Notebook blog

{Photographs and tutorial all © Decorator’s Notebook – you are welcome to share but please do not re-post the entire tutorial and always link with love!}

Print any photo as a polaroid: free template!

25 Apr

When my brother Joe came up with this simple method for turning some favourite digital snaps into perfect Polaroids for the backdrop of our Showcase stand, I knew you’d love to get your hands on the template. So, I’ve invited him to do his first guest post here and share the DIY – over to you bro!

Print any digital photo as a polaroid free template from Decorators Notebook blog

Hi, Joe here!

If you love Polaroid format pictures as much as I do, you’ve generally got two options: buy a bargain Polaroid camera then shed tears over the cost of the film, or shell out almost as much on send-away Instagram printing.

Now, I print my DSLR photographs for the princely sum of 10p each at my local Asda, so the above options just didn’t add up for me. So instead, I decided to have a go at designing a Photoshop template that meant I could print any digital photo I liked as a Polaroid – and it worked!

Print any digital photo as a polaroid free template from Decorators Notebook blog

Turn any digital photo into a Polaroid print

Your photos as jpegs

Photoshop (or if you want almost the same thing for free, I recommend GNU GIMP)


1. Download my free Polaroid template PNG image and open in Photoshop or GIMP
2. Drag in your photograph as a layer* and re-order the layers so your photo is behind the Polaroid template
3. Select your photograph layer and use the re-size and move tools so that the desired section of the image appears in the square portion of the Polaroid template. It’s likely that your photo will be huge compared to the template, but just shrink it down to size**
4. Save or export image as a JPEG
5. Put the pictures on a memory stick and take to your local photo processing place or use your home printer
6. Use a guillotine or craft knife to trim the bottom white portion from the photo, leaving a thicker border at the base than the sides

*Need help with layers? Watch this YouTube video for Photoshop or this one for GIMP.

**The template size is 12×8 inches which will automatically be scaled down to 6×4″ by the photo processor but allows the file to be a higher resolution to start with. If you chose to print it in a different ratio, the Polaroid image will no longer be square.

I really hope you like it – I’ll be on hand in the comments section to answer any questions!

– Joe

If you found my post useful, please share it! Buttons below…

Print any digital photo as a polaroid free template from Decorators Notebook blog

{Photographs, tutorial and template © Decorator’s Notebook}

15-minute make: nail polish marbled Easter eggs

29 Mar

How fun do these look?! There are loads of Easter egg decorating ideas about but I picked this one from Camille Styles to share because it doesn’t involve anything you won’t already have around the house. Can’t wait to try it this weekend!

how to marble easter eggs with nail polish

Easter eggs marbled with nail polish

Marbled Easter Eggs

Blown eggs (instructions here)

Nail polish (2-3 in a pleasing colour combo)

Plastic tub half-filled with water

Stirring stick

Kitchen towel

Simple drying stand made from card or foam board with drawing pins stuck through

marbled easter eggs DIY step by step

1) Pour a few drops of nail polish into the water.

2) Swirl around with your stirring stick to combine the colours a little – take care not to over-mix.

2) Working carefully but quickly, dip the eggs into the water, twirling them around until they’re covered all over with colour. Set aside on your drying rack.

3) If the nail polish left in the water has become too blended, scoop it off the surface with a plastic spoon and repeat step 1. Carry on until all your eggs are looking pretty.

If you found my post useful, please share it! Buttons below…

decorated easter eggs

{all Camille Styles}

Have a fabulous Easter weekend and thank you soooo much to those of you who came to visit Joe and I at Somerset House last weekend to preview our new venture. I was really touched and we loved meeting you all in person!