Tag Archives: craft ideas

Homemade Christmas wreath with a contemporary twist

18 Dec

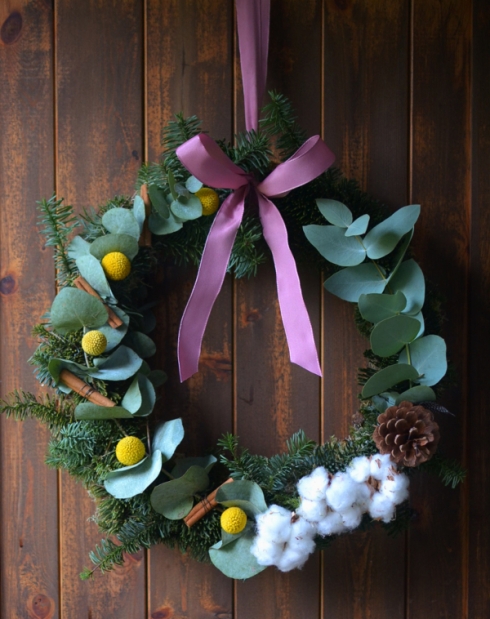
Homemade Christmas wreath with eucalyptus DIY

Homemade Christmas door wreath contemporary foliage

{© Decorator’s Notebook}

I absolutely LOVE Christmas – not so much for the day itself but for those leading up to it. The little rituals mean so much to me: choosing the tree, making the cake, planning how I’ll decorate the table and waiting excitedly for everyone to arrive. And now this year I have a pretty homemade wreath on the door to greet them!

On Sunday Lou arranged a tasty lunch and a crafty afternoon for a handful of Westcountry bloggers and kindly invited me along as a newcomer to the group. My little network of blogging friends is one of the few things I do actually miss about London, so it was lovely to meet some kindred spirits in my new/old area. Xanthe from Ivory Flowers supplied us with a beautiful array of foliage and decorations to use and we had spent a relaxing afternoon chatting while binding clumps of earth-scented moss, lush pine, orange slices and dried flowers onto our wreaths. With such a fantastic array of ingredients to choose from it was fun seeing all the finished results… I opted for a bit of contemporary style using eucalyptus, cheerful billy buttons, cotton heads and cinnamon sticks.

Now every time I arrive home I have a reminder of a lovely afternoon and a special welcome for our Christmas visitors!

For more ideas, visit my fellow bloggers and admire the beautiful wreaths they created too: Lou at Littlegreenshed | Lottie at Oyster & Pearl | Cathy at Bristol Parenting Cafe | Kat at Housewife Confidential | Laura at Circle of Pine Trees | Natalie at Thistle Apples

DIY: air drying clay Christmas tree decorations

13 Dec

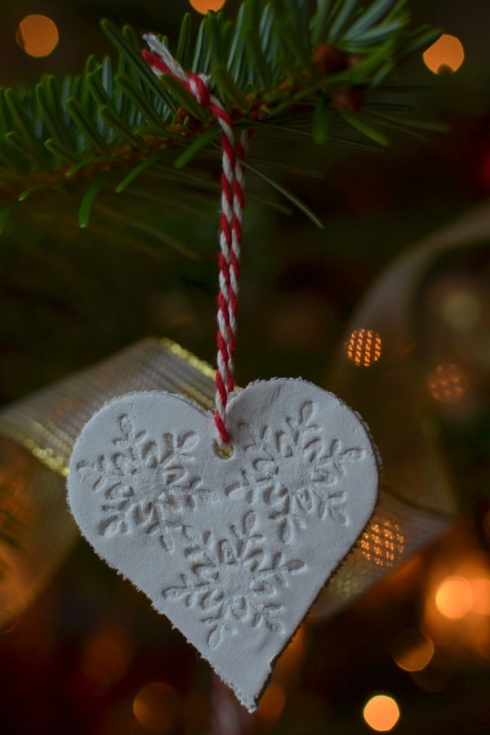
I just love DAS clay… a couple of years ago I used it to make these simple clay tree decorations and this week we had a go at some more using different rubber stamps to create an embossed effect.

DAS clay Christmas tree decoration DIY LR

Air drying clay Christmas decorations LR

DAS clay snowflake Christmas tree decoration LR

{Decorator’s Notebook}

For those who haven’t used it before, DAS air-drying clay can be rolled and moulded like salt dough but dries to an off white ceramic finish. A big 1kg block costs under £5 from Amazon or local craft shops. We used about a third of  packet to make about 25 decorations.

Air Drying Clay Christmas Tree Decorations

1) Slice off about one third of a 1kg block of DAS air drying clay. Seal the remainder quickly in the packet as it soon dries out.

2) Roll out the clay to about 1.5mm thick on a smooth surface. Cut out shapes using a range of biscuit cutters – we chose snowflakes and hearts but anything festive will do… play around with the different ones you have cutting positive and negative shapes and various sizes.

3) Working quickly before the clay dries, emboss the decorations using rubber stamps or found materials like lace and hessian. Anything you can find with a pretty textures surface will work nicely.

4) Use the plastic casing of a biro to cut a small hanging hole in the top of each shape for hanging.

5) Leave until the clay is leather hard, then gently lift the decorations from your worksurface and transfer to a warm dry place to dry out. These are thin so will only take a few hours. They’ll harden up and lighten in colour when they’re dry.

6) Thread with twine or ribbon and they’re ready to hang on the tree!

These are really simple and certainly easy enough to try with the kids this weekend. Don’t forget to share the results with us on Instagram / Twitter / Pinterest @DecoratorsNotes or on our Facebook page.

Free printable! Illustrated holiday gift tags

21 Nov

This is the first time I’ve reblogged an archive post (I won’t be making a habit of it) but I thought it would be good to share our free gift tags with you a second time because we posted them a bit too late last year and I know a lot of you missed the chance to use them.

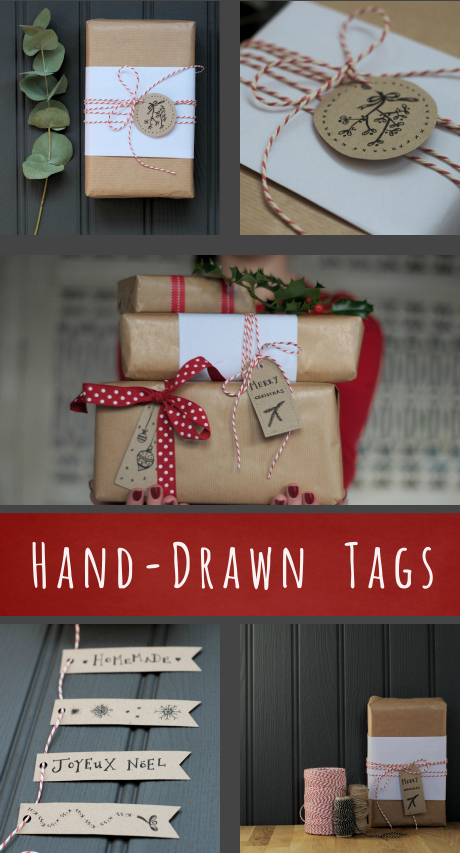
So, last Christmas I designed this lovely set of hand-drawn Christmas / holiday gift tags as a little present for you to download and print at home. Joe and I are already busy designing this year’s set which will be available soon, but in the meantime, here’s another chance to grab the 2012 design.

free printable holiday gift tags

free printable christmas gift tags

16 free gift tags to download and print

{© Decorator’s Notebook / Photographs Joe John}

There are 16 different designs which are easy to download and print on whatever card you like. We used A4 kraft (from eBay) but some readers got really creative with these last year and even got their kids involved colouring in the pictures.

They’re free for everyone… all we ask is that you share a link via Twitter, Pinterest, Instagram or Facebook. You’re also welcome to include them on your own blog too, but please enter into the Christmas spirit and share a link to this post rather than pinching the download link!

PLEASE SHARE THIS POST then click here to download your free gift tags PDF


Visit Decorator's Notebook Shop www.decoratorsnotebook.co.uk

15-minute make: vintage cigarette card garland

21 Jun

Caroline from Patchwork Harmony came up with this sweet and simple craft idea for the latest Crafty Fox Box and has been kind enough to let me share it for today’s 15-minute make.

vintage cigarette card garland DIY

Cigarette card garland

Vintage cigarette cards (try car boot sales and eBay)

Sewing machine

Thread

pretty floral cigarette cards

stitching cigarette cards to make a garland

1) Sort your cards into the order you want them to be in the finished garland. Take the first one and position it under the foot of the sewing machine so the needle is about 5mm from the top of the card.

2) Stitch across the top of the card. When you reach the end stitch a gap of about 5mm then add the next card.

3) Keep going to create a garland as long or short as you like!

Tip: The finished garlands can tangle easily so it’s better to make several shorter strings than one really long one and store them folded into a concertina.

cigarette card bunting{Project and photographs Caroline Taylor / Patchwork Harmony}

Thanks for sharing Caroline! If you’re antiquing this weekend keep your eyes peeled for bundles of pretty cigarette cards and have a go.

15-minute make: graphic painted tablecloth

7 Jun

If you can paint a straight line, you can paint this tablecloth. Now that’s my kind of DIY!

graphic-pattern-painted-tablec{Photograph and project adapted from Tina Fussell for A Subtle Revelry}

Graphic painted tablecloth

Cotton tablecloth or flat sheet, washed without fabric softener and dried

Black fabric paint (eg: Dylon)

Paintbrush

Iron

1) Iron the tablecloth, lay down on the floor (protect the floor with a waterproof dust sheet) and hold down at the corners with masking tape. You can paint the pattern freehand, but if you feel nervous mark out a grid with masking tape.

2) Paint on the crosses. Make them as big, small, regular or irregular as you like. Arrows or dots would also work well.

3) When the paint is dry, iron the tablecloth on the reverse to fix the paint (or follow the fixing instructions on your fabric paint pack).

4) Top with cakes and admire!

For more step-by-step photographs of see the full project at A Subtle Revelry

Cute and quick homemade thank you cards

28 May

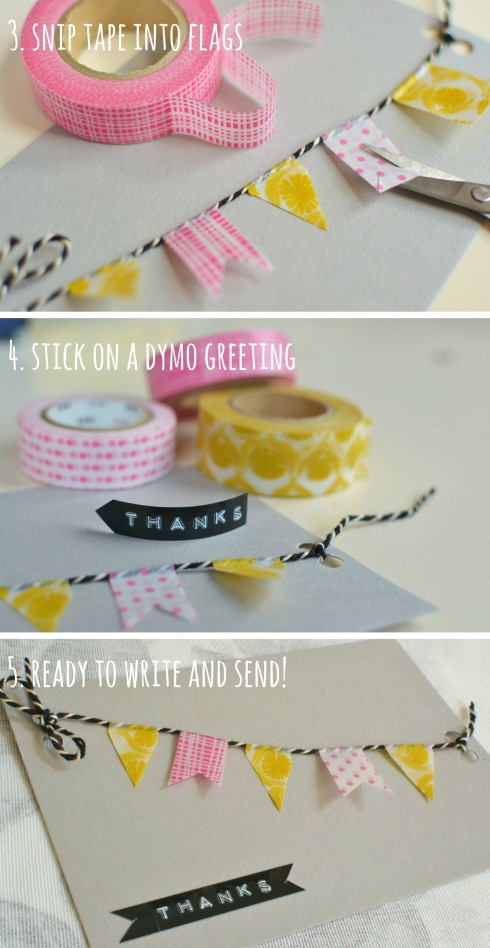
I’ve had it drummed into me since I was little that it’s essential to send thank you cards to relatives who’ve given you presents. In recent years I’ve always tried to make them myself, partly because I think handmade cards are that little bit more special and partly to make up for the fact I usually send them weeks late. Here’s a quick how-to of this year’s design…

homemade thank you card ideas

homemade thank you cards DIY

handmade card ideas how to{all Decorator’s Notebook}

Once you’re on a roll, each handmade card will only take a few minutes and it’s easy to vary the design with different coloured washi tape, twine and snipping the flags and dymo labels into slightly different shapes.

These would made lovely homemade birthday cards or invitations too.

If you found my post useful, please share it! Buttons below…

15-minute make: magnetic storage tins

14 Apr

I’ve posted before about my tendency to buy foods just because I like the packaging. My kitchen cupboards are full of decanted jam, biscuits and spices – some labelled, others not. Sometimes fun / disastrous at mealtimes!

magnetic upcycled storage tins

This (slightly belated) 15-minute make will require you to shop around for pretty tins and find another home for the contents… that’s the hardest part over and done with. The rest of this DIY couldn’t be easier! My local Turkish supermarket is a goldmine of nice packaging, or scout car boot sales for vintage alternatives.

paprika and mustard tins

magnetic storage tins DIY tutorial

Magnetic Storage Tins

Selection of square or rectangular tins

Magnets

Super glue / glue gun

1) Empty, rinse and dry the tins.

2) Glue a magnet onto the back of each tin. Use two magnets if you plan to store something heavy. Leave to dry.

3) That’s it!

magnetic storage tins tutorial{A Pretty Cool Life}

These tins are really handy on the fridge or invest a mere £11 in a magnetic knife strip from IKEA and you can stick them anywhere. I like the idea of a whole row above my desk for pens and paperclips or inside the door of my DIY cupboard for nails and screws.

15-minute make: nail polish marbled Easter eggs

29 Mar

How fun do these look?! There are loads of Easter egg decorating ideas about but I picked this one from Camille Styles to share because it doesn’t involve anything you won’t already have around the house. Can’t wait to try it this weekend!

how to marble easter eggs with nail polish

Easter eggs marbled with nail polish

Marbled Easter Eggs

Blown eggs (instructions here)

Nail polish (2-3 in a pleasing colour combo)

Plastic tub half-filled with water

Stirring stick

Kitchen towel

Simple drying stand made from card or foam board with drawing pins stuck through

marbled easter eggs DIY step by step

1) Pour a few drops of nail polish into the water.

2) Swirl around with your stirring stick to combine the colours a little – take care not to over-mix.

2) Working carefully but quickly, dip the eggs into the water, twirling them around until they’re covered all over with colour. Set aside on your drying rack.

3) If the nail polish left in the water has become too blended, scoop it off the surface with a plastic spoon and repeat step 1. Carry on until all your eggs are looking pretty.

If you found my post useful, please share it! Buttons below…

decorated easter eggs

{all Camille Styles}

Have a fabulous Easter weekend and thank you soooo much to those of you who came to visit Joe and I at Somerset House last weekend to preview our new venture. I was really touched and we loved meeting you all in person!

15-minute make: porcelain pen plates

22 Feb

Here’s a simple DIY using just two ingredients… a porcelain pen and a plain white plate. You could try out any design you want, but I really love the simplicity of this graphic pattern. It looks great and there’s no particular drawing skill needed to recreate it – just the kind of crafting I like!

white plates decorated with porcelain pen DIY craft idea

Porcelain Pen Decorated Plates

Fire at home porcelain pen

Basic white plates

1) Read the instructions on your porcelain pen – follow those if they differ from mine!

2) Give the pen a good shake and press the nib of the pen down several times on a sheet of scrap paper to get the ink flowing.

3) Start drawing your design on the plate, starting in the centre and turning the plate as you work to avoid smudging.

4) Leave to air dry for 24 hours then bake in the oven for 35 minutes at 150ºC / Gas Mark 2. Once fired the pen should be dishwasher safe but I’d recommend hand washing your masterpiece to be on the safe side.

porcelain pen plate DIY{Project and Photography Mormorsglamour}

Have a great weekend everyone. I’m getting behind the wheel for the first time in over 5 years… wish me luck!

15-minute make: heart shaped paperclips

8 Feb

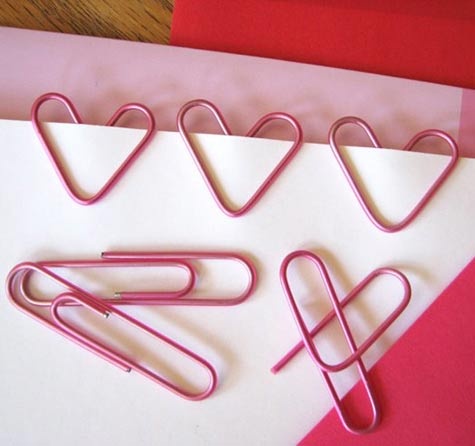
heart shape paperclips valentines craft ideasWhether you’re planning to send a love letter to a secret admirer, give a little bag of homemade chocolates to your best friend or pop a bookmark in a page of the Kama Sutra, these adorable heart-shaped paperclips will make your message that little bit more loving.

heart paper clips DIY valentines craft{How About Orange}

This must be one of the quickest DIYs ever, so I reckon you could easily heart-ify a whole pack of 25 pink paperclips inside 15 minutes.

Happy crafting my sweethearts… click for more quick craft ideas.