Archive | 15-minute make RSS feed for this section

Make a pretty floral wreath from wallpaper scraps

31 Mar

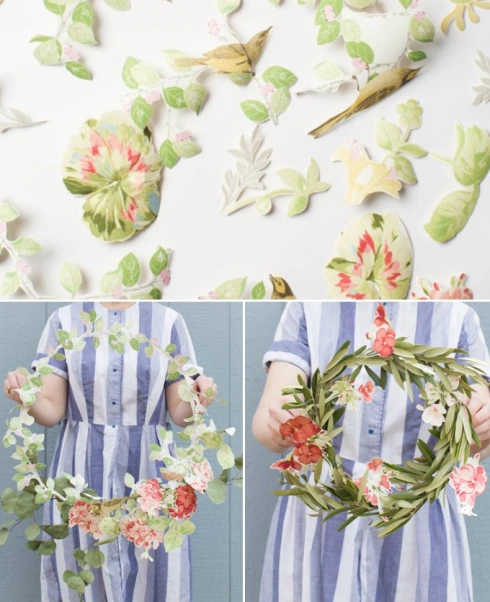
I loved creating my flower crown from garden blooms and blossoms last week but was a little sad to find it didn’t last more than a few hours. Today I came across this beautifully simple craft project by The House That Lars Built and thought my fellow floral craft fans might be keen to try it too!

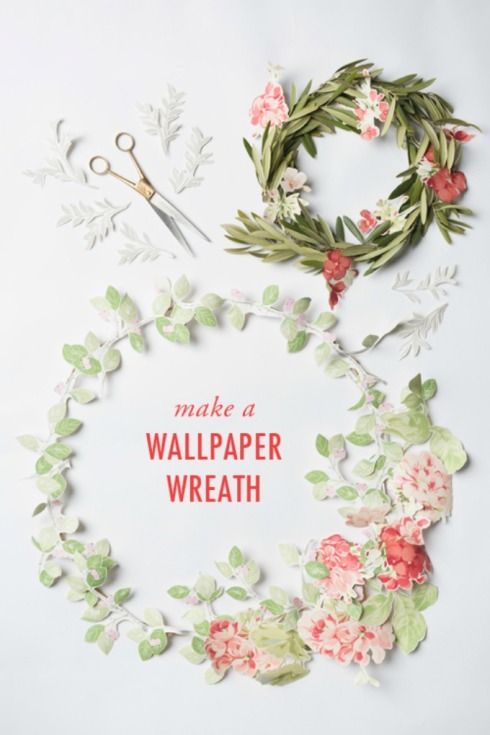
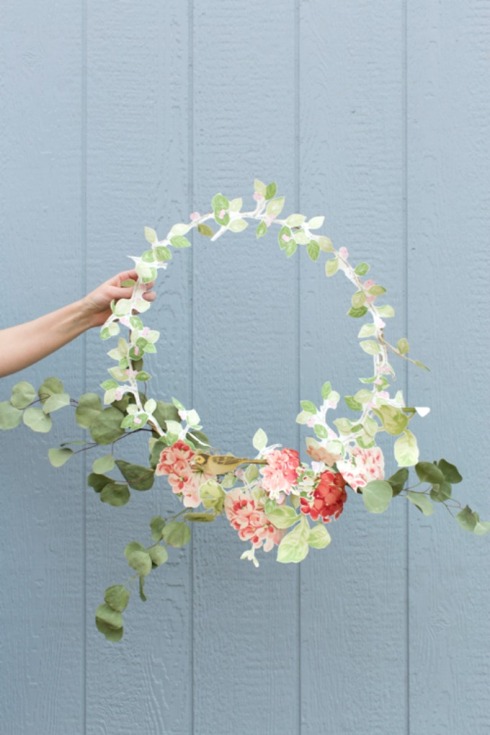
It’s a great way to use up offcuts of wallpaper, which I always feel bad about throwing away. If you don’t have any that are right though, wallpaper shops will usually provide free samples – ask them to give you a piece large enough to show the whole repeat and it will probably be big enough to make this. The wallpaper used here is from Laura Ashley.

wreath-made-from-greenery-and-wallpaper

how to make a wreath from floral wallpaper scraps

make-a-wallpaper-wreath-with-laura-ashley

{Photographs Trisha Zemp | Project The House That Lars Built}


This simple paper wreath would look so pretty on a door or hanging above the bed in a guest bedroom. Find full instructions for how to make it at The House That Lars Built.

15-minute make: autumn wreath DIY

21 Oct

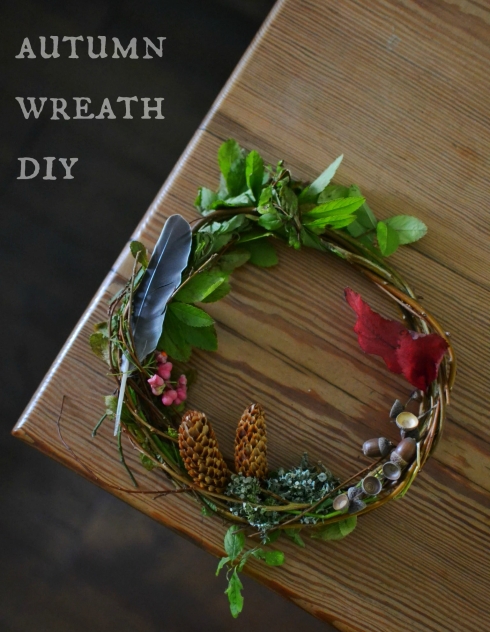
Autumn is the most beautiful and intriguing time to live in the countryside. It’s when I get my strongest cavegirl tendencies and I love gathering nuts, berries and mushrooms to cook and preserve. Inspired by the return of Nature in the Home this week I decided to get crafty with my autumn gatherings (instead of eating them!) and make something pretty to bring indoors.

autumn wreath DIY

1) Start off by making a base for your wreath. I took advantage of the heap of prunings in the garden and grabbed a handful of spiraea but there’s no science to this and any slim, flexible stems will do. Take a small bunch in your hands and bend them round into a ring, twisting the stems together as you do. At the top of your circle, cross the tops over and wind the loose ends back around the ring to create a basic wreath. Tuck in any escaped twigs. I left on some of the fresh leaves but snip them off if you want a longer-lasting decoration.

how to make a wreath at home

2) Get out and about and gather up some interesting autumn bits to decorate your wreath. Even if you live in the city you should be able to collect plenty of colourful leaves, pinecones and feathers in your local park.

autumn collection of natural objects

3) It’s completely freestyle from now on! The basic wreath can be adapted using whatever natural ingredients you can find. I set out to try and make this wreath with only natural elements (no wire or glue) as I always find it inhibitive to have to assemble materials before I get started. Instead, use the twisted stems of you wreath to weave in the decorations – there should be spots all around where you can tuck them in tightly.

fall wreath DIY

{Project and photos all Decorator’s Notebook blog}

That’s it! The best thing about this project is that each and every wreath is going to be different and the basic idea will work just as well in other seasons. Make your own Christmas wreath for the holidays by adding fircones, evergreen foliage and red berries or an easter wreath with lots of feathers and blossom. Mine hasn’t completely dried out yet, but I can’t see any reason why the twiggy wreath base wouldn’t last and be reusable again and again.

15-minute make: rhubarb mojito

26 Jul

I love rhubarb. I love mojitos. No further explanation needed.

rhubarb mojito cocktail recipe

Rhubarb Mojito

for each glass

65 ml  white rum
4 tablespoons rhubarb syrup (recipe below)
5 mint leaves
1 tablespoon lime juice
½ teaspoon lime zest
pinch nutmeg
lots of crushed ice
thinly sliced rhubarb and mint sprigs to garnish
 

1) Pop the nutmeg, lime juice, zest and mint leaves into the bottom of the glass and muddle together using the end of a wooden spoon until the mint leaves are well bruised and smelling gorgeous.

2) Add the rum and rhubarb syrup. Stir together then fill the glass to the brim with crushed ice. Finish with a garnish of rhubarb slices and mint sprigs.

rhubarb mojito cocktail

Rhubarb Syrup

3 small stalks of chopped rhubarb
225 g caster sugar
500 ml water
¼ teaspoon cinnamon
¼ teaspoon nutmeg
½ vanilla bean (optional)
 

1) Place all the ingredients into a small non-stick saucepan. Bring to the boil then reduce to a simmer for 5-7 minutes.

2) Remove from the heat and allow to cool. The extra syrup with keep in the fridge for up to two weeks and is delicious drizzled on ice-cream, greek yogurt or strawberries.

rhubarb mojito recipe{recipe (adapted) and photographs Not Without Salt}

15-minute make: vintage cigarette card garland

21 Jun

Caroline from Patchwork Harmony came up with this sweet and simple craft idea for the latest Crafty Fox Box and has been kind enough to let me share it for today’s 15-minute make.

vintage cigarette card garland DIY

Cigarette card garland

Vintage cigarette cards (try car boot sales and eBay)

Sewing machine

Thread

pretty floral cigarette cards

stitching cigarette cards to make a garland

1) Sort your cards into the order you want them to be in the finished garland. Take the first one and position it under the foot of the sewing machine so the needle is about 5mm from the top of the card.

2) Stitch across the top of the card. When you reach the end stitch a gap of about 5mm then add the next card.

3) Keep going to create a garland as long or short as you like!

Tip: The finished garlands can tangle easily so it’s better to make several shorter strings than one really long one and store them folded into a concertina.

cigarette card bunting{Project and photographs Caroline Taylor / Patchwork Harmony}

Thanks for sharing Caroline! If you’re antiquing this weekend keep your eyes peeled for bundles of pretty cigarette cards and have a go.

15-minute make: graphic painted tablecloth

7 Jun

If you can paint a straight line, you can paint this tablecloth. Now that’s my kind of DIY!

graphic-pattern-painted-tablec{Photograph and project adapted from Tina Fussell for A Subtle Revelry}

Graphic painted tablecloth

Cotton tablecloth or flat sheet, washed without fabric softener and dried

Black fabric paint (eg: Dylon)

Paintbrush

Iron

1) Iron the tablecloth, lay down on the floor (protect the floor with a waterproof dust sheet) and hold down at the corners with masking tape. You can paint the pattern freehand, but if you feel nervous mark out a grid with masking tape.

2) Paint on the crosses. Make them as big, small, regular or irregular as you like. Arrows or dots would also work well.

3) When the paint is dry, iron the tablecloth on the reverse to fix the paint (or follow the fixing instructions on your fabric paint pack).

4) Top with cakes and admire!

For more step-by-step photographs of see the full project at A Subtle Revelry

15-minute make: garlic, rosemary and chilli almonds

3 May

With the bank holiday weekend approaching and drinks with friends (or if we’re lucky, a picnic) on the horizon, these spicy nibbles are perfect for today’s quick recipe. And yes, clock-watching readers – you’ll be well shy of 15 minutes on this one. Let’s just say I’ve given you five minutes to collect the rosemary from the garden!

garlic rosemary and chilli almond recipe{adapted from The Passionate Cook}

Garlic, rosemary and chilli almonds

1 teaspoon olive oil

200g almonds

2 cloves garlic, crushed

2 large sprigs of rosemary, leaves only

1 teaspoon dried chilli flakes (or adjust to taste)

1 teaspoon coarse sea salt


1) Gently heat the olive oil in a heavy-based frying pan then add the almonds. Sizzle gently for 3-4 minutes until heated through and beginning to brown a little.

2) Add all the other ingredients, apart from the sea salt. Stir well to coat the almonds and heat for 1 minute more (take care not to burn the garlic, which can become bitter).

3) Line a bowl with kitchen paper and tip in the nuts. Shake around a little to soak up any excess oil then sprinkle with sea salt.

4) Pop into a serving dish and enjoy with a glass of bank holiday Pimms!

I hope you have something lovely planned for the next few days. I have a couple of little excursions on the cards so will be back on Tuesday to catch up!

15-minute make: magnetic storage tins

14 Apr

I’ve posted before about my tendency to buy foods just because I like the packaging. My kitchen cupboards are full of decanted jam, biscuits and spices – some labelled, others not. Sometimes fun / disastrous at mealtimes!

magnetic upcycled storage tins

This (slightly belated) 15-minute make will require you to shop around for pretty tins and find another home for the contents… that’s the hardest part over and done with. The rest of this DIY couldn’t be easier! My local Turkish supermarket is a goldmine of nice packaging, or scout car boot sales for vintage alternatives.

paprika and mustard tins

magnetic storage tins DIY tutorial

Magnetic Storage Tins

Selection of square or rectangular tins

Magnets

Super glue / glue gun

1) Empty, rinse and dry the tins.

2) Glue a magnet onto the back of each tin. Use two magnets if you plan to store something heavy. Leave to dry.

3) That’s it!

magnetic storage tins tutorial{A Pretty Cool Life}

These tins are really handy on the fridge or invest a mere £11 in a magnetic knife strip from IKEA and you can stick them anywhere. I like the idea of a whole row above my desk for pens and paperclips or inside the door of my DIY cupboard for nails and screws.

15-minute make: nail polish marbled Easter eggs

29 Mar

How fun do these look?! There are loads of Easter egg decorating ideas about but I picked this one from Camille Styles to share because it doesn’t involve anything you won’t already have around the house. Can’t wait to try it this weekend!

how to marble easter eggs with nail polish

Easter eggs marbled with nail polish

Marbled Easter Eggs

Blown eggs (instructions here)

Nail polish (2-3 in a pleasing colour combo)

Plastic tub half-filled with water

Stirring stick

Kitchen towel

Simple drying stand made from card or foam board with drawing pins stuck through

marbled easter eggs DIY step by step

1) Pour a few drops of nail polish into the water.

2) Swirl around with your stirring stick to combine the colours a little – take care not to over-mix.

2) Working carefully but quickly, dip the eggs into the water, twirling them around until they’re covered all over with colour. Set aside on your drying rack.

3) If the nail polish left in the water has become too blended, scoop it off the surface with a plastic spoon and repeat step 1. Carry on until all your eggs are looking pretty.

If you found my post useful, please share it! Buttons below…

decorated easter eggs

{all Camille Styles}

Have a fabulous Easter weekend and thank you soooo much to those of you who came to visit Joe and I at Somerset House last weekend to preview our new venture. I was really touched and we loved meeting you all in person!

15-minute make: homemade honeycomb

8 Mar

When I was doing my A-levels I had a Saturday job as a waitress in a local hotel. On my way back and forth to the pot wash I’d stop by the pastry kitchen to watch and scrounge. It was there I discovered the alchemy that is homemade honeycomb (cinder toffee).

homemade honeycomb cinder toffee recipe

I think it’s one of the easiest yet most impressive sweet treats you can possibly make, so it’s perfect when you need a little present to take to a dinner party… or pop it into a pretty box or jar and surprise your Mum for Mother’s Day on Sunday.

Homemade Honeycomb

100g caster sugar

4 tablespoons golden syrup

1.5 teaspoons bicarbonate of soda

Silicone mat or baking parchment

Optional extras: nuts, seeds, coconut shavings, melted dark chocolate

1) Put the sugar and syrup into a large non-stick saucepan, mix together then put on a medium heat. Resist the temptation to stir the mixture once it’s on the heat. Just watch it carefully as it melts, then turns into a golden brown goo. This will take about three minutes

2) Take the pan off the heat then whisk in the bicarbonate of soda and watch the magic happen! The mixture will transform into a foaming golden cloud – tip it immediately onto the silicone sheet / baking parchment. Sprinkle over the nuts, seeds and coconut if using.

3) Leave the honeycomb to set and cool then break into shards. Dip or drizzle with melted dark chocolate if you like, although I think it’s absolutely scrummy just as it is.

cinder toffee hokey pokey recipe{Photographs At Down Under / Recipe adapted from Nigella Lawson}

I urge you to try this – it’s so easy and so much fun to make. And it tastes like funfairs!

15-minute make: heart shaped paperclips

8 Feb

heart shape paperclips valentines craft ideasWhether you’re planning to send a love letter to a secret admirer, give a little bag of homemade chocolates to your best friend or pop a bookmark in a page of the Kama Sutra, these adorable heart-shaped paperclips will make your message that little bit more loving.

heart paper clips DIY valentines craft{How About Orange}

This must be one of the quickest DIYs ever, so I reckon you could easily heart-ify a whole pack of 25 pink paperclips inside 15 minutes.

Happy crafting my sweethearts… click for more quick craft ideas.