

 {all Decorator’s Notebook}
All spotted during my recent trip to Yeo Valley Farm with the lovely crew from This is Your Kingdom.
{all Decorator’s Notebook}
All spotted during my recent trip to Yeo Valley Farm with the lovely crew from This is Your Kingdom.
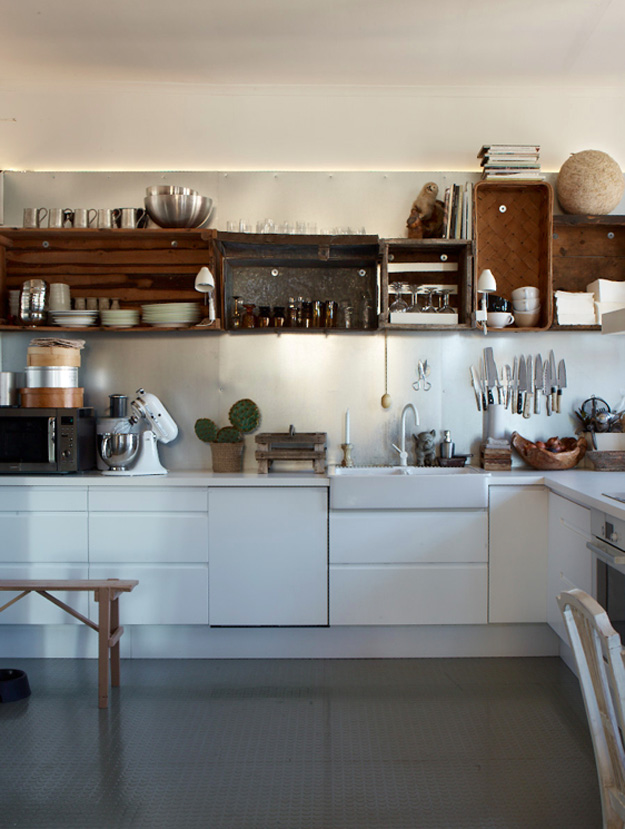
Happy Friday everyone! I hope this light and airy room captures the mood of the moment for you and has plenty of elements to discuss for The Room Debate today.
Everyone’s welcome to join in of course. If it’s your first time, simply take a good look at the photo below then head to the comments with your answers to these two questions:
One thing I like most about this room is…
One thing I like least about this room is…

There are plenty of things to love about this room for me… but a couple of things that irritate me too! Looking forward to hearing what you think…
Have a lovely weekend – I’m off to Art in Action in Oxford and really looking forward to it.
Even though I love the rustic look, kitchens made entirely from reclaimed wood are too much for me, so I am very much appreciating this best-of-both combo.
 {via Style at Home}
Also very much appreciating the use of cactus and stuffed ferret.
I’ve posted before about my tendency to buy foods just because I like the packaging. My kitchen cupboards are full of decanted jam, biscuits and spices – some labelled, others not. Sometimes fun / disastrous at mealtimes!

This (slightly belated) 15-minute make will require you to shop around for pretty tins and find another home for the contents… that’s the hardest part over and done with. The rest of this DIY couldn’t be easier! My local Turkish supermarket is a goldmine of nice packaging, or scout car boot sales for vintage alternatives.


Magnetic Storage Tins
Selection of square or rectangular tins
Magnets
Super glue / glue gun
1) Empty, rinse and dry the tins.
2) Glue a magnet onto the back of each tin. Use two magnets if you plan to store something heavy. Leave to dry.
3) That’s it!
These tins are really handy on the fridge or invest a mere £11 in a magnetic knife strip from IKEA and you can stick them anywhere. I like the idea of a whole row above my desk for pens and paperclips or inside the door of my DIY cupboard for nails and screws.
 {Danny Seo / Miki Duisterhof via Country Living}
When I was a child I was a bit of a magpie and my coat pockets were permanently filled with treasures I’d picked up and squirreled away… a grey feather, a scrap of ribbon, a patterned pebble or a shard of sea-smoothed glass. This simple craft idea takes moments and is one way to get part of your collection out on display.
Pebble Photo Holder
Nice smooth pebbles
Paper covered floristry wire
Pliers
1) Take a 20cm length of wire and wrap one end around the pebble. Twist to secure it tightly at the base.
2) Stand the remaining wire upright then twist the other end into a flattened spiral – the easiest way to do this is grip the end of the wire with pliers then wrap the next 3-4cm of wire tightly around them. Press with your fingers to flatten.
3) Pop a postcard, photo or polaroid into the top and voila! Experiment with different sized pebbles and lengths of wire to make a pleasing group.
Have a lovely weekend – wrap up warm!
I’m fascinated by photo projects and am always intrigued by the niche subjects people choose. Kinfolk magazine (my new obsession) led me to The Makers Project by Brooklyn-based photographer Jennifer Causey. Jennifer has made it her mission to capture the creative goings-on on her doorstep. From painters and florists to perfumers and distillers, she’s recorded the relaxed beauty of the people, their products and places of work.


It was a struggle to pick one maker to showcase here because each photo story has its own beauty and charm, but I loved the simplicity of this profile of woodworker Ariele Alasko. She started off studying sculpture and now works full time crafting headboards, tables and breadboards from salvaged wood gathered from buildings being pulled down in her neighbourhood.


In between stints in her workshop Ariele also manages to write the very lovely Brooklyn to West blog (check out the about page for a sneak peek of her apartment), fit out an extremely cool restaurant and sell her wares.
 {all Jennifer Causey / The Makers}
The Makers Project website is a pretty addictive so I strongly suggest you while away an hour or two flipping through Jennifer’s photo stories. You can read more about why she started the project in Kinfolk volume five which I’ve recently discovered is available through this trusty online outlet. Kinfolk fans of the UK rejoice!
It’s been a while since I shared a blog crush, but two lovely posts about Decorator’s Notebook this week at Tea For Joy and Furnish reminded me how nice it is to celebrate fellow bloggers.
The Fabulous Scavenger has only been going for a few months but it’s already full of clever projects for upcycling vintage finds. Ok, I admit that my praise is tinged with envy… just look at these amazing children’s chairs writer Samantha found on the side of the road and this beautifully battered spirit level from a charity shop. Some people just seem to have all the luck!
Anyway, let’s find it in our hearts to be pleased for her and look at some of Samantha’s brilliant projects.


I was really intrigued to read about what Samantha calls ‘the hard rubbish collection’ – a designated day where households can put junk outside their homes for the council (or whatever they call bin men across the pond) to pick up. Apparently scrap metal collectors and keen vintage hunters cruise the streets in the hope of beating the official rubbish truck and picking up some treasure for themselves. These little spice jars were rescued from the roadside and after a quick wash they make lovely mini vases.


This spirit level wall hook DIY couldn’t be simpler – just screw one to the other and voilà! Such a clever yet straightforward idea.


{all The Fabulous Scavenger}
There’s so much I love about this bedroom: the headboard made from old mirror frames, those adorable children’s chairs at the end of the bed and the easy lamp update using a colourful scarf. Further proof (if we ever needed it) that a little splash of yellow improves almost any room.
With so many great ideas to share so soon after starting blogging, I’ll definitely be keeping a close eye on The Fabulous Scavenger from now on. Go and check it out… I think you’ll agree!
So, did you see it? I honestly didn’t know whether to laugh or cry. Or where to look – at the TV screen or my Twitter timeline, which was buzzing with talk of nothing else!
One of the things that got me growling at the telly was the indiscriminate use of terms like ‘shabby chic’, ‘vintage’, ‘retro’ and ‘upcycling’. I honestly felt that kind of cringing you get when your grandad says the word ‘sex’. By the time it got to the boardroom and Lord Sugar was saying “upcycling” (in a tone that suggested invisible airfinger speech marks) every 30 seconds I was actually wincing and had my hands ready to cover my ears.
But from an academic perspective the thing that got me thinking most was those on Twitter who were getting angry and upset that The Apprentice candidates were making a mockery of people who sell and upcycle vintage furniture for a living. To me, they’re getting the wrong end of the stick. Those candidates went into the task thinking as I suspect many people do… “this is easy, anyone can do it.” However, what they managed to prove is that no, you can’t. Sure, anyone can stencil a Union Jack onto something (anything) or write Shabby Chic on a luggage tag and hope for the best, but to make something that’s genuinely desirable and covetable you need creativity, skill and a sense for good design.
So, for today I thought I’d post some examples of upcycled pieces that I find inspiring and innovative. Saying that, I think we definitely need a new word to describe this… every time I type upcycled I can feel my fingers tensing up!

I really like this lampshade made from vintage rulers from Roost Living. I think it works because it takes items that are already nicely designed but not overly useful (at least, not once you’ve left school) and turns them into something that’s still nicely designed but useful in a different way. No extra faff or bling – just simple and charming.

{via Apartment Therapy}
You might already be sick of the whole wooden pallet thing, but I think this pallet plate rack is still really clever. It’s a completely new use of a genuinely redundant object and fits into the room in a way that doesn’t shout about its old purpose or feel particularly contrived.
Am I on shaky ground with this one? I’m going to argue for it because I think it’s clever, it costs almost nothing and it does something practical. No, I don’t think you should pay a single penny for someone to make it for you but I think it’s a great idea.
A good quality, functional but probably not too attractive wardrobe updated with good quality, attractive but not very functional wallpaper offcuts. Symbiotic upcycling at its best!
Of course, I’m not saying there aren’t some shocking examples out there – I was tickled that one tweeter suggested last night’s episode of The Apprentice should’ve been sponsored by Regretsy – but of course, I wouldn’t be bitchy enough to point out any bad examples.
Hang on, what’s that?
Oh. It appears that I am.
And I’ve made a special Pinterest board of the best (worst) I could find. Sorry… couldn’t help it.

Please do comment with other pieces (good and bad) and tell me what you think of the whole upcycling thing!
After all the embellishment and lavish decorations of Christmas have been packed away, I find myself drawn to simpler styles as the New Year begins. I spotted this quirky Brighton home before Christmas but wanted to save it, as it’s a perfect example of the relaxed, reclaimed look I’m coveting at the moment and I didn’t want it getting lost amongst all the glitter and glitz.

I really like the idea of using a wooden trouser hanger to clip up a scrap of wallpaper. I’m all for adding pattern without commitment! They’re good for hanging artwork too.
Apparently the owner of the house found the flower painting on the fireplace leaning against the side of a skip… why does this NEVER happen to me??? If you’ve ever managed to pick up something amazing on the side of the road I’d love to know what you found. What am I doing wrong?

I have a small woven rug with a pattern similar to the one on this sofa that I bought in Bolivia years ago. It’s somewhere in a cupboard or drawer somewhere at my Mum’s house and I meant to dig it out while I was there over Christmas. Unfortunately I was too busy guzzling mince pies and sloe gin and completely forgot.

Note the desk made from an old scaffolding plank and hooks made from vintage drawer handles screwed onto a bit of wood.

More junk shop handles in the kitchen, mixed and matched on the plain shaker-style units. I like the vintage posters pasted into the glass door panels for privacy too… a nice old-fashioned alternative to window film.
 {all Holly Jolliffe via The Guardian}
My Granny’s collected vintage jelly moulds for years (though I suppose lots of them weren’t actually vintage at the time she bought them). She’s planning to move into a smaller house this year and I’m hoping to take a few off her hands, dutiful Granddaughter that I am! Perhaps one or two of them might find themselves upcycled into something like this light. Did you spot the apple crate bedside table too? Simple and perfect.
Don’t forget to comment with your best skip finds!


Lovely comments