At last, the forest green walls in my bathroom have been transformed into a nice cool grey. Time to finally hang the 1930s mirror collection I’ve had in the cupboard under the stairs for the last five years! Creating a frameless mirror display is harder than it looks so I thought I’d put together a little ‘how to’ with some tips and tricks.
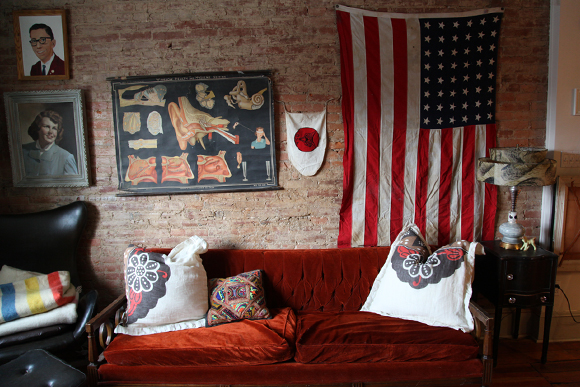
Boring before…

Beautiful after…

How to hang a display of frameless vintage mirrors
YOU WILL NEED:
- Mirrors
- Roll of parcel paper or large offcuts of wallpaper
- Pencil
- Masking tape
- Heavy duty picture hooks with at least two screw holes
- Screws and rawlplugs suitable for your wall type
- Tape measure / ruler
- Drill
- Screwdriver
1) Check the fixings on the back of each mirror are secure (frameless mirrors can be very heavy) and tighten them if necessary. I thought my display would look neater if the chains were hidden so I shortened some of them by adjusting the positions of the fixings and clipping off the excess chain with wire cutters.

2) Trace around each mirror on the parcel paper and cut out to make a template. Sketch on the position of any patterns and mark the top/bottom if necessary.

3) Lay all the templates out on the floor and move them around the create an arrangement you like. Take a photo to act as a reference.

4) Use masking tape to fix the templates onto the wall in the same positions, tweaking the arrangement if necessary. I swapped the bottom right-hand and left-hand mirrors over as I could see that would fit better once I had the templates up on the wall.

5) Start with the mirror that will hang in the bottom centre position. Lay it face down on the floor and loop your hook under the chain. Pull the chain taught and measure how far down the lower screw hole is from the top of the mirror.

6) Place the hook on top of the corresponding paper template, measure the same distance from the top and mark the position of the screw hole on the wall. You should be able mark through the paper with the template still in place. Then mark the position of the other screw hole, using the hook as your guide.
7) Remove the template and drill holes in the marked positions. Tap in rawlplugs and securely screw in the hook. The easiest way to do this is to start the screw off with a manual screwdriver then finish it off tightly with an electric screwdriver if you have one.

8) Repeat for all the mirrors making any small adjustments to the positions as you go along. Stand back and admire your handiwork!
 {all Decorator’s Notebook}
I’m really happy with how it’s turned out and my bathroom looks so much lighter and more spacious now.
If you found my post useful, please share it! Buttons below…
Tags: 1930s mirrors, bathroom walls, decorating blog, decorating ideas, DIY, frameless mirrors, grey bathroom, how to, how to create a mirror wall, how to hang frameless mirrors, how to hang mirrors, ideas for bathrooms, ideas for walls, interior design, interiors blog, mirror wall, tutorial, vintage bathroom, vintage mirrors


 {all Brigette for The Free People blog}


")


Lovely comments